Smoothie packs are a simple way to eat healthy while traveling. They’re pre-portioned ingredients - usually frozen - that save time, reduce food waste, and make blending quick and easy. Here's what you need to know:
- Why They Work: Convenient, portable, and help you get more fruits and veggies. Perfect for busy schedules and limited food options.
- Ingredients: Use freezer-friendly options like berries, bananas, spinach, kale, and avocado. Add extras like chia seeds or protein powder.
- Preparation: Pre-cut, portion, and freeze ingredients in airtight containers. Label with details like serving size and liquid to add.
- Storage: Keep smoothie packs frozen at 0°F or below. Use insulated bags or dry ice for travel.
- Blending On-the-Go: Portable blenders, like BLENDi models, make it easy to mix anywhere, from hotel rooms to road trips.
Smoothie packs let you enjoy nutritious meals without compromising your routine, even while traveling. Keep reading for detailed tips on prepping, storing, and blending.
Easy Smoothie Freezer Packs - Make Your Own
Selecting and Preparing Ingredients
When it comes to smoothie prep, picking the right ingredients is key. You want options that freeze well, keep their nutrients intact, and blend easily. Let’s dive into how to choose the best travel-friendly ingredients, prep them efficiently, and store them safely.
Choosing Travel-Friendly Ingredients
The best smoothie ingredients are those that maintain their flavor and nutritional value after freezing. Here are some top picks:
- Berries: Strawberries, raspberries, blueberries, and blackberries are available year-round and packed with antioxidants and fiber.
- Cherries: Known for their anti-inflammatory benefits, cherries can aid in exercise recovery and improve sleep, making them a great choice for travelers.
-
Avocado: Want a creamy texture? Avocado is perfect. Frances Largeman-Roth, RDN, shares:
"I like using avocado in my smoothies to add creaminess, heart-healthy fats and fiber."
-
Pineapple: This tropical fruit isn’t just delicious - it’s rich in vitamin C, fiber, antioxidants, and manganese. Cynthia Sass highlights its benefits:
"Pineapple is great for skin health and promotes healthy digestion."
- Bananas: These add natural sweetness and freeze well, whether whole or sliced.
For veggies, spinach and kale can be frozen raw without losing much nutrition. Cauliflower, carrots, and bell peppers also freeze well when prepped (e.g., steamed, diced, or chopped).
Other great additions include acai (best used frozen due to its short shelf life) and nutrient boosters like chia seeds, hemp seeds, flaxseed, and protein powder, which can be pre-measured for convenience.
Portioning and Pre-Cutting Ingredients
Prepping your ingredients ahead of time ensures consistency and saves effort later. Aim for balanced portions, like 1½ cups of fruit, 2 cups of greens, and 1–1½ cups of liquid per smoothie.
- Fruits and Vegetables: Cut everything into small, blender-friendly pieces. For example, slice bananas before freezing and pre-freeze them on a baking sheet to avoid clumping.
- Nut Butter: Freeze individual scoops on parchment paper or layer it between fruits to prevent blending headaches.
- Dry Ingredients: Measure items like chia seeds, hemp seeds, and protein powder into single-use bags or small containers.
- Leafy Greens: Wash and dry thoroughly to prevent freezer burn. Excess moisture can ruin texture and flavor.
Bailey Sissom from Simply Sissom emphasizes the importance of preparation:
"Proper prep makes assembling your smoothie packs quick and easy."
An assembly-line method works best - lay out all ingredients and prep each pack systematically. Once everything is prepped, you’re ready to freeze.
Freezing and Storing Ingredients Safely
Freezing the right way is crucial for maintaining freshness and flavor. Follow these tips:
- Freeze at Peak Ripeness: This locks in natural sweetness and nutrients. Spread ingredients out on a baking sheet first, then transfer to containers once frozen to prevent sticking .
- Use Airtight Containers: Remove as much air as possible to avoid freezer burn. Label containers with dates and contents so you can use older packs first. Properly stored ingredients can last up to 3 months.
- Temperature Matters: Keep packs at 0°F or below. If traveling, use a high-quality cooler with ice to maintain this temperature.
- Freeze Liquids: Pour coconut water, yogurt, or citrus juice into ice cube trays. These frozen cubes make it easy to add flavor and nutrients to your packs.
To preserve freshness, ensure ingredients stay under 40°F to prevent oxidation. With these storage techniques, your smoothie packs will stay fresh and nutrient-rich, ready for blending wherever your travels take you.
Assembling and Storing Smoothie Packs
With all your ingredients prepped, it’s time to assemble your smoothie packs. The process is simple, but a little attention to detail can make them perfect for travel and easy to use.
Step-by-Step Assembly Process
Bailey Sissom, the creator of Simply Sissom, explains the idea behind smoothie packs:
"A frozen smoothie pack contains pre-portioned ingredients ready to blend, requiring only the addition of liquid. When you're ready, just dump it in the blender, add your liquid of choice, and hit go."
Start by choosing 2–3 different smoothie recipes to keep things interesting. Avoid recipes with ingredients that don’t freeze well, like watermelon or citrus segments, as they can affect the texture.
Before you begin, gather your containers and labels. Use freezer-safe labels to write down the smoothie name, the liquid to add when blending, and the number of servings. This small step will save you a lot of guesswork later.
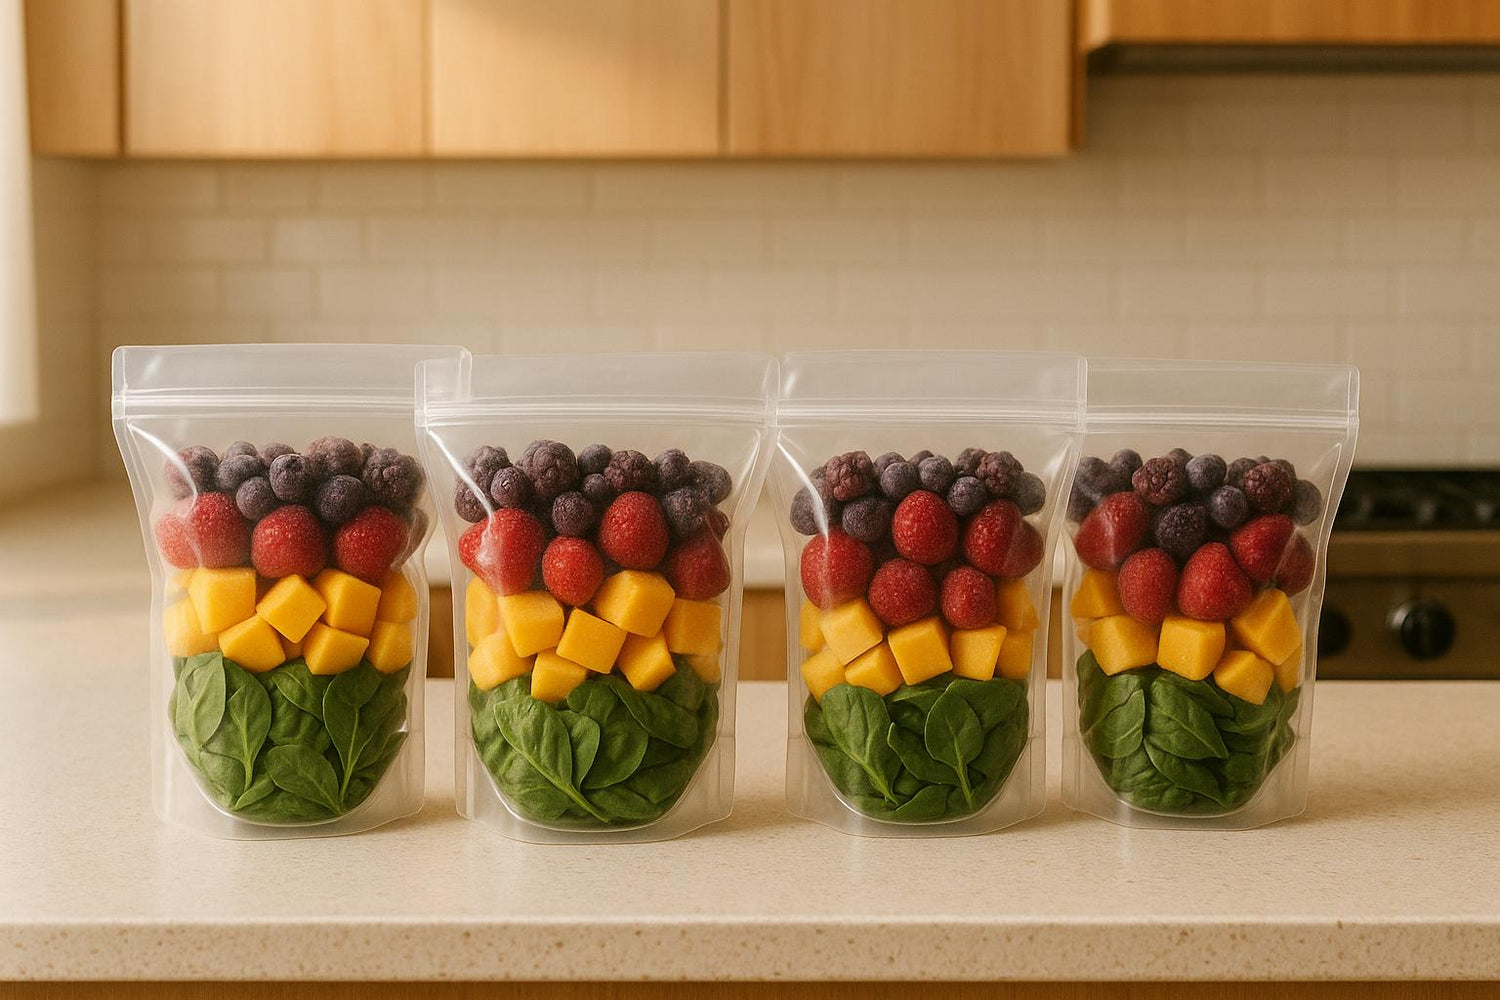
When assembling, layering the ingredients can make a big difference. Place heavier frozen fruits at the bottom, add leafy greens in the middle, and finish with lighter add-ins. For freezer bags, remove as much air as possible before sealing to prevent freezer burn, and lay them flat in the freezer for even freezing and easier storage.
If you’re looking for inspiration, Simple Green Smoothies offers a sample prep guide for seven smoothies. Their recipe includes 5 cups spinach, 2 cups kale, 3 bananas, 3 oranges, 2 cups mango, 2½ cups pineapple, and 2 cups strawberries. It’s a great starting point for delicious, naturally sweet blends.
Labeling and Storage Tips
Once your smoothie packs are assembled, proper labeling and storage are key. Write the date in MM/DD/YYYY format along with the smoothie name, the type and amount of liquid to add, and any special instructions. This ensures you don’t forget any details when it’s time to blend.
For storage, airtight containers are essential, especially if you plan to thaw the packs in the fridge overnight. This helps prevent evaporation and keeps the ingredients fresh.
Storage Times and Travel Scenarios
When it comes to keeping your smoothie packs fresh, storage times and handling are crucial. Frozen smoothie packs stay at their best for up to 3 months in a standard freezer. If left unrefrigerated, smoothies last around 2–5 hours depending on the temperature, while refrigerated packs can remain fresh for up to 2 days if stored correctly. Once thawed, use the smoothie within 24 hours for the best flavor and quality.
For travel, invest in a good cooler or mini-fridge to maintain the right temperature. Keep in mind that many hotel mini-fridges aren’t ideal for freezing, so if your packs thaw, plan to use them within 24 hours.
For day trips or packed lunches, freeze your smoothie in a freezer-safe cup or thermos overnight. In the morning, place it in an insulated lunch box with a few ice packs. This method can keep your smoothie cold for up to 5 hours.
Plant-based smoothies are often better for travel than dairy-based ones, as fruits and vegetables handle temperature changes more reliably. Also, consider the climate of your destination - hot, humid areas may require extra cooling, while cooler places give you more flexibility.
sbb-itb-75eb6cf
Blending On-the-Go: Portable Solutions
Once you've prepped and stored your smoothie packs, the next step is blending them when you're out and about. This is where portable blenders shine - they turn your ready-to-go ingredients into fresh, delicious smoothies in minutes. These compact devices are a game-changer for anyone looking to stick to their nutrition goals while on the move.
Why Portable Blenders Are Perfect for Travel
Portable blenders make it possible to whip up smoothies, protein shakes, sauces, or dressings wherever you are. Unlike bulky countertop models, these blenders are compact and lightweight, fitting easily into your backpack or carry-on. They're rechargeable and easy to clean, making them ideal for blending on the go - whether you're at an airport, in a hotel room, or camping. Plus, they let you create fresh, nutrient-packed snacks, helping you avoid less healthy options and cut down on single-use plastics like bottled drinks or disposable cups.
BLENDi Portable Blender Lineup
The BLENDi family offers three models to suit different needs:
| Model | Price | Motor Power | Capacity | Key Features |
|---|---|---|---|---|
| BLENDi Lite | $22.50 | 70-Watt | 17oz | Lightweight, quiet, ideal for basic smoothies |
| BLENDi Pro+ | $44.99 | 120-Watt | 17oz | Ice-crushing, converts to travel bottle, travel case |
| BLENDi X | $59.99 | 150-Watt | 24oz | Dual blending modes, largest capacity, water bottle mode |
The BLENDi Lite is a great pick for travelers who value portability. At just $22.50, it’s affordable and handles basic smoothie tasks with ease. Its whisper-quiet motor is perfect for early risers blending in shared spaces like hotel rooms.
For tougher blending tasks, the BLENDi Pro+ is a standout. Its 120-Watt motor effortlessly handles frozen fruits and ice, making it perfect for those prepped smoothie packs. It recharges in under two hours via USB-C and can blend up to 15 times on one charge. One satisfied customer, Maeve S., shared:
"I didn’t think a portable blender could handle frozen fruit, but this one blew me away. It crushed ice, blended my smoothie in 30 seconds, and didn’t struggle once!"
The BLENDi X takes things up a notch with a powerful 150-Watt motor and a larger 24oz capacity, ideal for meal replacements or bigger servings. It features dual blending modes for better texture control and even converts into a water bottle for added convenience.
How to Use Portable Blenders
Using your BLENDi with pre-made smoothie packs is simple. Before your first use, ensure the blender is fully charged. Twist the clear jar all the way to the right until "88" appears on the display - this indicates it's securely locked.
To blend, start by adding liquid to the jar. Then, pour in your frozen smoothie pack ingredients, secure the lid, and blend. Avoid overfilling the jar, as leaving some space allows the ingredients to blend smoothly. If the blender stops or shows an error, reduce the amount of ingredients or recharge the device before trying again.
As customer Esther B. puts it:
"I’m always rushing between work and workouts, and this blender has been a game changer. I can make a shake in the car, at my desk, or even at the gym. It’s fast, charges quickly, and fits in my tote."
The BLENDi Pro+ is particularly reliable for frozen or tough ingredients. In July 2025, customer Kaden Arterburn praised its ability to handle challenging blends, producing smooth results every time.
Cleaning is a breeze. Add water and a drop of dish soap to the jar, run a quick blend cycle, and rinse thoroughly. This keeps your blender ready for your next use and prevents residue buildup. Keep in mind, though, that BLENDi blenders can’t be used while charging, so plan accordingly.
Lastly, for safety, avoid blending hot liquids, as this could damage the plastic. Stick to cold or room-temperature liquids, which pair perfectly with frozen smoothie packs.
Tips for Maintaining Freshness and Nutrition
Keeping your smoothie packs fresh and packed with nutrients while traveling boils down to two key factors: temperature control and airtight storage. By managing these effectively, you can ensure your smoothie ingredients stay in great condition throughout your trip.
Using Insulated Bags or Dry Ice
For short trips, insulated lunch bags paired with ice packs are a reliable option. They keep your smoothie packs chilled for several hours, making them perfect for day trips. However, if you're traveling for a longer period or need to keep items frozen, dry ice is the better choice.
Dry ice, with its extremely low temperature of -109.3°F (-78.5°C), can keep your smoothie packs frozen for 24 to 48 hours, depending on the quality of your cooler's insulation. Unlike regular ice, dry ice turns directly into gas as it sublimates, leaving no moisture behind to affect your smoothie packs. For a 25-quart cooler, using 5–10 pounds of dry ice can maintain freezing conditions for up to 24 hours.
When packing with dry ice, place a layer of regular ice or insulation at the bottom of your cooler, followed by the dry ice. To prevent over-freezing, separate your smoothie packs from direct contact with the dry ice by using foam or newspaper. Make sure the cooler has proper ventilation to avoid pressure buildup, and always handle dry ice with gloves for safety.
| Storage Method | Temperature | Duration | Residue | Best For |
|---|---|---|---|---|
| Insulated bag + ice packs | 32°F (0°C) | 4–6 hours | Water residue | Day trips, short travel |
| Dry ice + insulated cooler | -109.3°F (-78.5°C) | 24–48 hours | No residue | Extended travel, camping |
For a simpler option on short trips, freeze a water bottle and pack it alongside your smoothie ingredients. As the ice melts, it keeps everything cool and doubles as a refreshing drink. You can also pre-freeze your insulated bags or containers overnight to boost their cooling ability.
Preventing Nutrient Loss
Preserving nutrients is all about protecting your ingredients from heat, light, and oxygen. These elements can cause significant nutrient degradation, especially for water-soluble vitamins like B and C.
To minimize nutrient loss, use airtight containers or vacuum-sealed bags to reduce oxidation. When packing smoothie ingredients, remove as much air as possible from freezer bags, and opt for rigid containers with tight-fitting lids. For quicker freezing and better nutrient retention, limit each package to a half-gallon or less in volume.
Freezing in small batches ensures better quality. Keep your freezer at 0°F or lower to maintain the freshness of your smoothie packs. To prevent browning in certain ingredients, like leafy greens, consider adding a touch of ascorbic acid. While browning may affect appearance, it doesn’t necessarily mean the smoothie is unsafe to consume.
Plant-based smoothies are more travel-friendly than dairy-based ones, as they can handle temperature fluctuations better, making them a great choice for trips where refrigeration might be inconsistent.
Storing Smoothie Packs at Hotels
When staying at a hotel, proper storage becomes essential to keep your smoothie packs fresh. Most hotel rooms come with mini-fridges, but freezer space is often limited. As soon as you arrive, transfer your smoothie packs to the fridge or freezer to preserve their quality.
If your room lacks a fridge, ask the front desk - many hotels can provide one upon request, especially for dietary needs. Some hotels also offer communal freezer space in guest kitchens or business centers.
For extended stays, consume smoothie packs within five hours of removing them from refrigeration to maintain their flavor and nutritional value. If you’re staying multiple days, use the hotel’s ice machine to keep your cooler stocked.
When using mini-fridges, avoid overcrowding the freezer compartment. Proper air circulation is crucial for consistent cooling. For business travelers or those on longer trips, establish a routine: blend your smoothie packs in the morning using a BLENDi portable blender, then prepare the next day’s pack in the evening. This ensures you’ll always have fresh, nutritious smoothies ready to go, no matter where your travels take you.
Conclusion
Traveling doesn’t have to mean sacrificing your nutrition. With a little preparation, you can enjoy fresh, wholesome smoothies no matter where you are.
Key Steps Summary
Here’s a quick rundown on how to prep travel-friendly smoothie packs:
Start by selecting freezer-friendly ingredients that maintain their texture, avoiding items like watermelon or citrus segments that can turn mushy when frozen. Cut everything into blender-ready pieces and portion them into single or double servings for convenience.
To keep your packs fresh, proper storage is key. Use airtight containers, label them with the smoothie name and serving size, and freeze them flat to save space.
Don’t forget to pack the right blending gear! Portable blenders make it easy to whip up smoothies without the need for a full kitchen. The BLENDi lineup offers options to suit different needs: the BLENDi Lite ($22.50) for basic blends, the Pro+ ($44.99) for tougher tasks like ice crushing, and the BLENDi X ($59.99) with dual blending modes and extra power for hard-to-blend ingredients.
For extended freshness during travel, insulated bags or dry ice can keep your smoothie packs in good condition for 24–48 hours.
Making Travel Nutrition Work for You
With smoothie packs and a portable blender, healthy eating on the go becomes a breeze. These packs not only save time but also let you customize ingredients to fit your dietary preferences. They’re packed with essential nutrients like vitamins, minerals, protein, and healthy fats to keep you energized and focused.
Research shows that thick smoothies can help you feel full, making them a smart choice for managing hunger while traveling. Plus, antioxidant-rich ingredients like spinach, kale, and blueberries can protect your cells from damage and may even lower the risk of chronic diseases.
BLENDi portable blenders are designed to make this lifestyle easy. As Brittany Westmoreland shares:
"The BLENDi portable blender is a game-changer! Its compact size and powerful blending capabilities make it perfect for on-the-go smoothies and protein shakes. The battery life is impressive, and it's super easy to clean. Highly recommend for anyone with an active lifestyle!"
Whether you’re battling jet lag, navigating limited food options, or just trying to stick to your routine, smoothie packs and a dependable portable blender ensure you’re always ready for a fresh, nutritious meal. With these practical strategies and the convenience of BLENDi, staying healthy on the road has never been so simple.
FAQs
How can I keep my smoothie packs fresh and nutritious while traveling?
To ensure your smoothie packs stay fresh and nutrient-rich while traveling, freeze them beforehand in airtight containers or resealable bags. Keep them in a cooler or an insulated bag with ice packs to maintain the right temperature.
For the best flavor and nutritional value, aim to use your smoothie packs within 24–48 hours. When it’s time to enjoy, simply thaw them or give them a quick re-blend. If you’re looking for extra convenience, a portable blender like the BLENDi makes blending on the go a breeze!
What’s the best way to use a portable blender with pre-made smoothie packs while traveling?
To get the best out of your portable blender and smoothie packs, start by prepping your ingredients ahead of time. Divide them into airtight containers or freezer-safe bags to keep everything fresh and make blending quick and easy when you're on the move. Using fresh, local produce is a great option, and you can mix in things like frozen fruits, leafy greens, or protein powder to create smoothies tailored to your taste.
For even more convenience, think about using a travel-friendly blender like BLENDi. Its compact design and powerful features make it perfect for blending wherever you are - whether that's in a hotel room, at a campsite, or during a road trip. Simply grab one of your pre-made packs, blend, and enjoy a fresh smoothie no matter where your adventures take you!
Can I customize my smoothie packs to fit my dietary needs or preferences while traveling?
When you're on the go, customizing your smoothie packs to fit your dietary needs or personal tastes is a breeze. Pick ingredients that suit your goals - like low-sugar fruits, protein-packed add-ins, or leafy greens loaded with nutrients. Pre-portion everything into freezer-safe bags or containers so they're ready when you are.
To make things even simpler, try using a BLENDi Portable Blender. Its compact, travel-friendly design and strong blending power let you enjoy fresh, perfectly mixed smoothies wherever your day takes you.

0 comments