Want to save money, eat better on the trail, and cut waste? DIY backpacking meals with zero-waste packaging are the solution. By prepping your own meals, you can reduce single-use plastics, control nutrition, and stick to Leave No Trace principles. Here’s the key idea: use reusable containers, bulk ingredients, and dehydrated foods to create lightweight, eco-friendly meal kits.
Key Highlights:
- Cost Savings: DIY meals cost $3–$5 per serving vs. $8–$12 for store-bought options.
- Low Waste: Replace single-use plastics with silicone bags, mason jars, or beeswax wraps.
- Nutrition Control: Customize meals with dried fruits, grains, and protein for energy-packed options.
- Tools Needed: Dehydrator, reusable containers, and optional gear like a portable blender.
- Easy Recipes: Oatmeal blends, quinoa bowls, and dehydrated chili are simple to prepare and rehydrate.
Quick Tips:
- Shop bulk to avoid packaging waste.
- Pre-portion meals at home for quick assembly on the trail.
- Use compostable or reusable storage to keep food fresh.
This guide covers everything from tools and recipes to storage and packing strategies, ensuring your next trip is waste-free and hassle-free.
Backpacking Food Basics: Tips for Reducing Plastic Waste
Tools and Ingredients for Zero-Waste Meal Prep
Embarking on a zero-waste backpacking adventure starts with the right tools and ingredients. The goal? To minimize waste while keeping your meals lightweight, efficient, and sustainable. Here’s a breakdown of the essential gear, ingredient choices, and shopping strategies to help you prep for your trip.
Tools for Zero-Waste Meal Prep
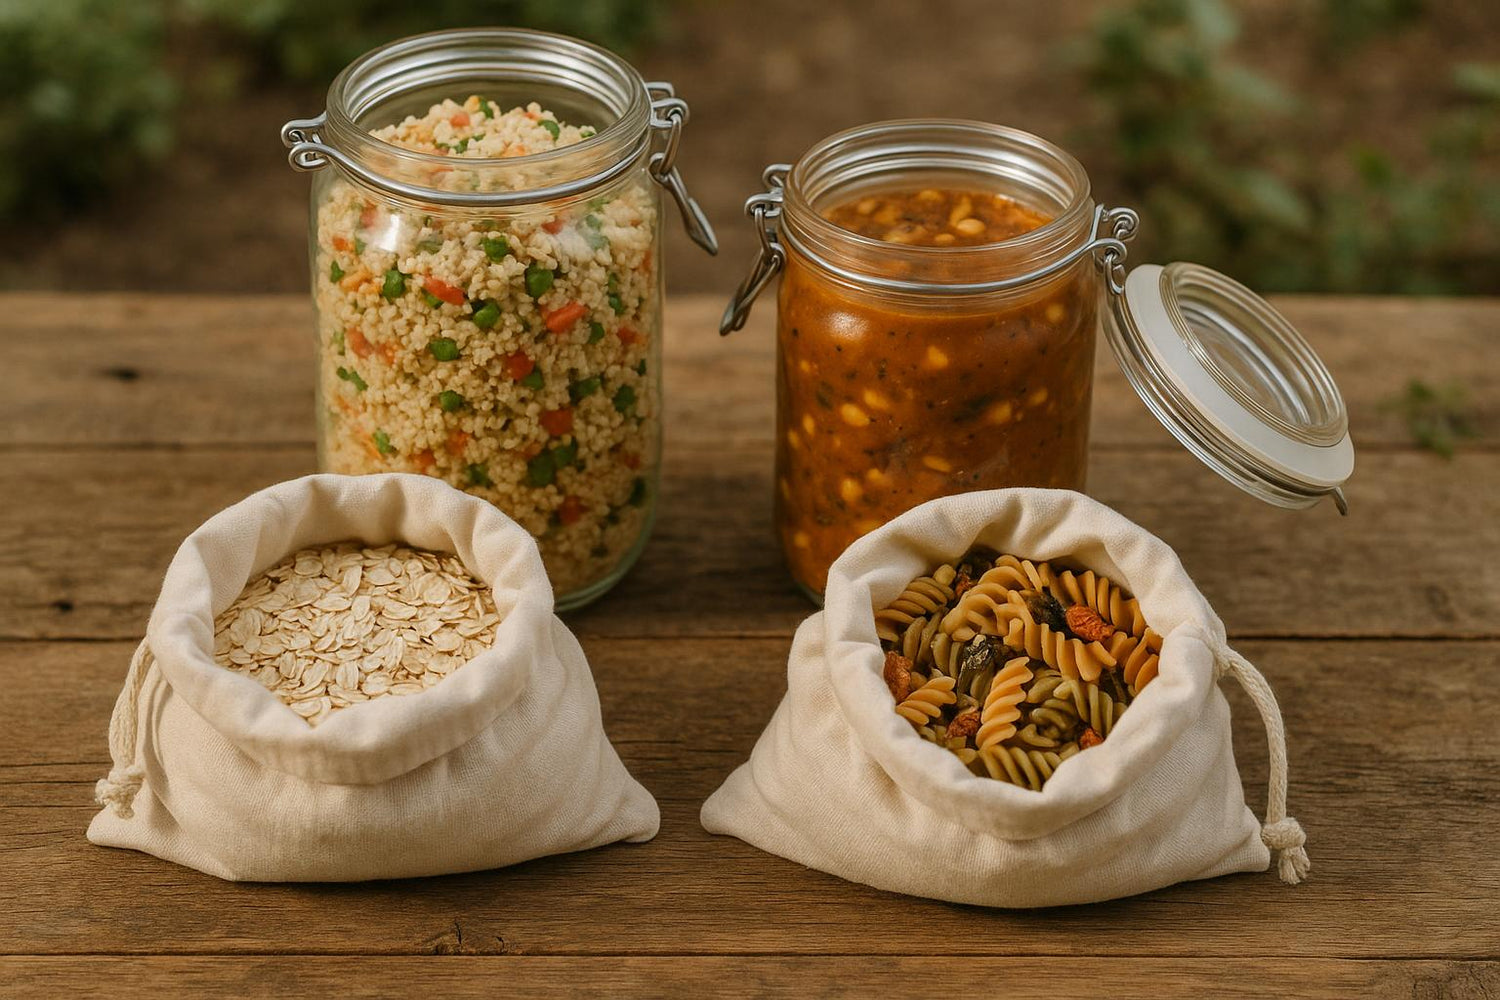
Reusable storage solutions are a must for zero-waste meal prep. Options like reusable silicone bags (around $10–20), mason jars (about $2–5), and beeswax wraps (roughly $5–10) are durable and eco-friendly. Mason jars, in particular, are versatile - they can double as storage containers, mixing bowls, and even eating vessels.
For on-the-go blending, consider the BLENDi Portable Blender, which is perfect for making smoothies, soups, or sauces while on the trail. These cordless, USB-rechargeable models come in different versions: Lite ($22.50), Pro+ ($44.99), and X ($59.99). Bonus: they also function as travel bottles.
Research has shown that using zero-waste meal prep systems can cut trail waste by up to 80% compared to traditional packaging methods.
Other helpful tools include a food dehydrator for preparing lightweight meals at home, measuring cups, a digital scale for portion control, and a cleaning brush to keep everything tidy.
Choosing Ingredients for Backpacking Meals
When it comes to ingredients, dehydrated and freeze-dried foods are your best friends. They’re lightweight, long-lasting, and easy to rehydrate with hot water. Examples include dehydrated vegetables, fruits, beans, and grains. For protein, options like textured soy protein or jerky provide a punch of energy without unnecessary packaging.
Powdered mixes are another smart choice. Products like instant potatoes, powdered milk, gravy mixes, and protein powders are compact, convenient, and align with zero-waste goals. Add nuts, seeds, and grains - such as oats, quinoa, and rice - for sustained energy. These items can often be purchased in bulk, cutting down on prepackaged waste.
Don’t forget about fats, which are crucial for flavor and calories. Nut butters or olive oil stored in glass jars are excellent options that are both practical and sustainable.
Shopping Tips for Zero-Waste Ingredients
Bulk shopping is key to reducing packaging waste. Bring your own containers to co-ops, health food stores, or even larger grocery chains with bulk sections, like Whole Foods or Trader Joe's. According to a 2023 survey by The Crooked Carrot, 60% of U.S. backpackers use reusable containers for food storage, and 45% actively seek out bulk ingredients to cut down on packaging waste.
Farmers markets are another great option. Shopping seasonally not only supports local growers but also helps you find items with minimal packaging. Plus, choosing products with recyclable or compostable packaging can further reduce your environmental impact. The EPA notes that food packaging makes up nearly 23% of landfill waste, so these small changes can make a big difference.
Step-by-Step Guide to Preparing DIY Backpacking Meals
With your zero-waste tools and ingredients ready, the next step is to prepare meals that are lightweight, easy to make, and sustainable. By doing most of the prep work at home, you can enjoy hassle-free meals on the trail. This process includes three main steps: dehydrating fresh ingredients, assembling complete meal recipes, and organizing everything for your trip.
Dehydrating and Pre-Mixing Ingredients
Start by dehydrating fresh ingredients at home to create lightweight, easy-to-rehydrate meal components. Wash and slice your produce evenly to ensure they dry and rehydrate consistently. For vegetables like carrots, peppers, or green beans, blanching them in boiling water beforehand helps retain their color and nutrients.
Spread the sliced ingredients in a single layer on dehydrator trays, avoiding any overlap. Set the dehydrator to 125–135°F for fruits and vegetables, and let them dry until they are brittle or leathery to the touch. This usually takes 6–12 hours, depending on the thickness and type of food. If you don’t have a dehydrator, you can use your oven on its lowest setting with the door slightly open, though this method uses more energy.
Pre-mixing dry ingredients is another time-saver. Combine everything you’ll need for a single meal - like oats, powdered milk, dried fruit, and spices for oatmeal - into one reusable container. This way, all you have to do on the trail is add hot water and stir.
For example, you can pre-mix a trail oatmeal blend with oats, dried strawberries, and coconut sugar, or a dinner mix with dehydrated beans, rice, dried onions, and seasoning. Label each container with simple instructions like, "Add 1 cup boiling water, stir, and wait 5 minutes." These pre-mixed packs make meal prep on the trail a breeze.
Sample Zero-Waste Backpacking Recipes
Here are a few easy recipes that use dehydrated ingredients and reusable containers, cutting packaging waste by up to 90% compared to store-bought options. Each meal provides 400–700 calories, ideal for keeping your energy up during long hikes.
- Strawberry Oatmeal: Combine quick oats, dried strawberries, and a little coconut sugar. At camp, just add hot water and let it sit for five minutes.
- Cranberry Granola Bars: Mix oats, dried cranberries, chopped nuts, and honey. Press into a pan at home, cut into bars, and wrap in beeswax wraps for a waste-free snack.
- Potato & Bacon Hash: Use freeze-dried potatoes, textured soy protein (TSP) bacon bits, and dried onions. Rehydrate with boiling water for a hearty, calorie-dense meal.
- Quinoa Burrito Bowls: Combine pre-cooked, dehydrated quinoa with black beans, corn, and spices. Add water on the trail for a quick, protein-packed dinner.
For a liquid option, try using a BLENDi Portable Blender to whip up fresh smoothies. Pack pre-portioned dried fruit, powdered greens, and seeds in reusable containers. At camp, add water, blend, and enjoy. A great combo is dried bananas, oats, and peanut butter powder blended with water for a high-energy breakfast. The BLENDi's compact size and rechargeable battery make it a great tool for backcountry trips, eliminating the need for single-use drink packaging.
Batch Cooking and Packing Tips
Batch cooking at home is another efficient way to prepare trail meals. Cook large portions of your favorite dishes, like chili, stew, or pasta sauce, then dehydrate them. Spread the cooked food evenly on dehydrator trays and dry until all moisture is gone. These meals rehydrate easily and retain their flavor, making them perfect for the trail.
Portion control is key to balancing nutrition and pack weight. Measure servings based on your activity level and energy needs to avoid carrying more food than you’ll eat.
Packing smartly can save space and reduce weight. Use flat, compressible containers and remove excess air from bags. Organize meals by day or type in clearly labeled or color-coded containers. Place heavier meals near the center of your backpack to maintain balance.
Consider multi-functional containers, like lightweight bowls that double as storage or mason jars that can store, mix, and serve food. Pre-portion snacks and condiments into small containers to avoid carrying unnecessary bulk.
Finally, test your recipes and rehydration methods at home before your trip. This ensures everything tastes good and works as expected when you’re out in the backcountry. Keep notes on water ratios and rehydration times to refine your process for future adventures. With these strategies, you’ll have an efficient, eco-friendly meal system ready for your next backpacking trip.
sbb-itb-75eb6cf
Zero-Waste Packaging Solutions for Backpacking
Once you've prepped your zero-waste meals, the next step is finding packaging that aligns with your eco-friendly goals. The ideal packaging should be lightweight, durable, and capable of keeping your food fresh - all while minimizing environmental impact. From reusable containers to repurposed household items, there are plenty of ways to ditch single-use plastics without sacrificing convenience on the trail.
Comparison of Packaging Options
Zero-waste packaging generally falls into three main categories: reusable containers, compostable bags, and biodegradable packaging. Each option has its pros and cons, depending on your hiking needs and preferences.
Reusable containers are often the go-to choice for reducing waste. For instance, silicone bags like Stasher cost $10–$20 each but are built to endure countless trips. Stainless steel containers, priced around $5–$15, are another durable option, though they add noticeable weight to your pack. Glass jars can work for sturdier foods but aren’t ideal for rough terrain due to their fragility.
Compostable bags, made from materials like PLA or cellulose, are lightweight and cost about $0.25–$0.50 per bag. Brands like BioBag offer plant-based options, with a pack of 25 priced between $5 and $10. However, these bags don’t hold up well in wet conditions, so they’re best for dry foods.
Biodegradable packaging is similar in price to compostable bags but may take longer to break down in nature. While these materials reduce landfill waste compared to traditional plastics, they still require proper disposal to achieve their intended benefits.
| Option | Durability | Weight | Cost (USD) | Environmental Impact |
|---|---|---|---|---|
| Silicone Bag | High | Moderate | $10–$20 | Very low (reusable) |
| Stainless Steel Tin | High | Heavy | $5–$15 | Very low (reusable) |
| Compostable Bag | Low | Light | $0.25–$0.50 | Low if properly composted |
Did you know? The average American generates about 4.9 pounds of waste daily, with single-use food packaging being a major contributor.
By choosing reusable options, backpackers can reduce waste significantly while saving money in the long run.
Tips for Repurposing Packaging
You don’t need to invest in new gear to go zero-waste - repurposing everyday items can be just as effective. Household items like glass jars, tin cans, and fabric bags can serve as practical, reusable food storage solutions.
- Glass jars: Great for storing dry goods or snacks. Just avoid bringing them on rugged trails where breakage is a risk.
- Tin cans: Clean, label-free cans can hold bulkier dry ingredients. Be sure to smooth out any sharp edges.
- Fabric bags: Cloth produce bags work well for items like bread or bagels. Even old bandanas can double as wraps for sandwiches or snacks.
- Beeswax wraps: You can make these at home by coating cotton fabric with a mix of beeswax, pine resin, and jojoba oil. They’re perfect for wrapping food and are reusable.
- Silicone baking mats: Cut them to size to create flexible food wraps.
- Mason jars: Ideal for salads or liquid-based meals that need to stay fresh.
For liquid meals or smoothies, pair your repurposed containers with a BLENDi Portable Blender. Pre-pack dried fruits, greens, and protein powders in jars, then blend them fresh with water on the trail. This eliminates single-use drink packaging while giving you more meal options.
Proper Disposal of Compostable Packaging
Even with compostable or biodegradable packaging, proper disposal is key. Following Leave No Trace principles means carrying out all waste, even materials labeled as compostable. In the cool, dry conditions of the backcountry, these materials can linger as litter for months or even years.
Back home, check your local composting guidelines - many facilities don’t accept compostable plastics or have strict requirements for disposal. Never burn packaging in campfires, as this can release harmful toxins and may violate fire safety rules. Before heading out, review the specific park’s website for waste disposal guidelines, as regulations often vary based on wildlife activity, seasonal changes, and other factors.
When in doubt, pack it out. Reusable options are always the safest choice for the environment and ensure compliance with local rules.
Storing, Transporting, and Assembling Meals on the Trail
Getting your zero-waste meals from home to your campsite takes a bit of planning. The goal? Keep everything organized, ensure your ingredients stay fresh, and make meal prep as hassle-free as possible.
Organizing Food for Backpacking
The easiest way to manage your meals is by sorting them by time: breakfast, lunch, and dinner. This not only saves you time but also limits how often your food is exposed to air and moisture, which helps maintain freshness while sticking to zero-waste principles.
Silicone bags are a great option for dehydrated meals because they’re flexible and seal tightly. Keep these in accessible compartments, with the first day’s meals near the top of your pack. If you’re bringing salads or wet ingredients, mason jars work well - but keep in mind their weight, which makes them better suited for shorter trips or when you need leak-proof storage.
For snacks, assign specific pockets in your pack so you can grab them quickly during breaks. Metal tins are another handy option, as they double as both storage containers and eating bowls, cutting down on the need for extra dishware. Labeling your containers can also save time when you’re digging through your gear.
To avoid food waste, pre-portion your meals before heading out. With everything organized, the next step is keeping your food fresh while on the trail.
Keeping Food Fresh on the Trail
Start by freezing or chilling ingredients, especially proteins and fresh produce, before packing them. Position these items in the center of your backpack, surrounded by other gear to act as insulation. This placement helps keep perishables cooler for longer.
Airtight containers are a must - not just to avoid spoilage but also to cut down on waste by eliminating the need for disposable packaging. Even a small amount of air can impact the texture and flavor of dehydrated foods. For longer trips, focus on shelf-stable items like dried fruits, nuts, grains, and properly dehydrated meals that don’t require refrigeration.
Plan your meals strategically. Eat perishable foods early in your trip, saving dehydrated or freeze-dried meals for later. Keep your food in the coolest section of your pack and away from direct sunlight.
For efficient rehydration and to conserve fuel, use food cozies. These insulated sleeves keep your meal warm while it rehydrates, cutting down on cooking time. Once your food is fresh and ready to go, the next step is quick and easy assembly.
Quick Meal Assembly While Backpacking
The simplest trail meals are those based on just-add-water recipes. With pre-mixed dehydrated ingredients, all you need to do is boil water, pour it into your reusable container, stir, and let it sit for 5–10 minutes. Eating directly from the container also minimizes cleanup.
Dehydrated meals rehydrate faster than freeze-dried ones, especially at higher elevations. Dehydrated options generally take 10–15 minutes, while freeze-dried meals may take 20 minutes or more.
If you’re craving something fresh, a BLENDi Portable blender can be a game-changer. Use it to whip up smoothies or protein shakes with pre-packed dried fruits, greens, and protein powders. Its self-cleaning feature makes cleanup easier, helping you stay aligned with your zero-waste goals.
For cleaning, use minimal water and a reusable cloth. A dedicated cleaning cloth can be rinsed and reused throughout your trip. If you need soap, opt for biodegradable options and use them sparingly - always away from water sources to protect the environment.
| Container Type | Best Use | Cleanup Method | Weight |
|---|---|---|---|
| Silicone Bags | Dehydrated meals, snacks | Rinse and air dry | Light |
| Mason Jars | Salads, wet ingredients | Rinse and wipe with cloth | Heavy |
| Metal Tins | Storage and eating bowls | Minimal water, cloth clean | Moderate |
Don’t forget to pack out all food scraps and waste, even if the packaging says it’s compostable or biodegradable. Backcountry conditions often slow down decomposition, so following Leave No Trace principles means carrying everything out with you.
Getting Started with Zero-Waste Backpacking Meals
Key Takeaways
Zero-waste backpacking meals aren’t just good for the planet - they’re also a smart way to save money and take charge of your nutrition. On average, making your own meals costs about $4.10 per serving, compared to the $8–$12 price tag for commercial freeze-dried meals. That’s cutting your food budget in half while ensuring you know exactly what’s going into your meals.
Did you know the typical backpacker generates up to 2 pounds of waste per day from conventional food packaging? Swapping single-use packaging for reusable options - like silicone bags, mason jars, or stainless steel tins - can make a huge difference. Plus, homemade meals offer balanced, energy-dense nutrition tailored to your needs.
To get started, you’ll want a few key tools. Airtight reusable containers are a must, along with a dehydrator for lightweight, trail-friendly ingredients. A multipurpose gadget like the BLENDi Portable Blender can also be a game-changer. It’s compact, handles tough ingredients like ice, and lets you whip up smoothies, soups, or sauces directly in reusable containers - perfect for backcountry adventures.
Shopping in bulk is another way to cut down on waste. Many grocery stores and co-ops have bulk bins where you can bring your own containers and buy exactly what you need. Focus on calorie-dense, shelf-stable items like dehydrated fruits, grains, legumes, nuts, and seeds. These ingredients not only pack a nutritional punch but also reduce packaging waste.
When it comes to prepping meals, a little organization goes a long way. Batch cook and pre-mix ingredients at home, then store them in labeled reusable containers. This approach lets you use fresh items early in your trip while saving dehydrated meals for later.
By adopting these practices, you’ll save money, reduce waste, and enjoy healthier meals on the trail.
Next Steps
Start small by replacing one or two packaged items with homemade alternatives on your next trip. Test your recipes at home to ensure they’re both tasty and easy to prepare.
Invest in quality reusable containers to build your zero-waste toolkit. If you’re a fan of smoothies or blended soups, consider the BLENDi Portable Blender (priced between $49.99 and $79.99) to expand your meal options without adding waste.
Visit bulk stores to stock up on sustainable ingredients, and connect with online communities or zero-waste backpacking blogs for inspiration and tips. Many experienced hikers share detailed meal plans and packaging hacks that can save you time and effort.
Finally, plan your next backpacking trip with zero-waste principles in mind. Create a meal plan that uses fresh items early and saves dehydrated foods for later. Pack everything in clearly labeled reusable containers, and bring along a small bag to carry out any food scraps. Taking it step by step will not only lighten your environmental footprint but also make your adventures more rewarding.
FAQs
What’s the best way to keep my DIY backpacking meals fresh and safe during a long trip?
To keep your DIY backpacking meals fresh and safe, it all starts with the right preparation and storage. Opt for reusable silicone bags or lightweight containers to seal your food securely while cutting down on waste. Choosing non-perishable or dehydrated ingredients is also a smart move - they last longer and are perfect for outdoor trips.
Want to whip up fresh meals on the trail? A portable blender like the BLENDi Lite, Pro+, or X can be a game-changer. These travel-friendly blenders are compact enough for your backpack and powerful enough to crush ice or blend smoothies right at your campsite. They’re a practical way to enjoy fresh ingredients while keeping your outdoor adventures eco-friendly.
How can I use a food dehydrator to make lightweight, zero-waste backpacking meals?
Using a food dehydrator is an excellent way to create lightweight, waste-free meals for backpacking trips. You can start by dehydrating a variety of ingredients, such as fruits, vegetables, cooked grains, and proteins. For the best results, slice everything thinly and evenly to ensure proper and consistent drying. Once dehydrated, store your food in reusable, airtight containers or compostable packaging to keep waste to a minimum.
To make things even easier while you're out on the trail, pre-mix your ingredients into individual meal portions before your trip. When you're ready to eat, just add hot water to rehydrate them. And if you’re a fan of smoothies or blended soups while adventuring, the BLENDi Portable Blender is a handy option. It’s compact, easy to pack, and perfect for outdoor escapades.
How can I plan lightweight, zero-waste backpacking meals that are also nutritious?
Planning lightweight, zero-waste backpacking meals that are both nutritious and practical starts with smart ingredient choices and eco-friendly packaging. Opt for compact, nutrient-packed foods like dehydrated fruits, nuts, seeds, and whole grains. These options are not only light to carry but also provide the energy and nutrients you need on the trail. To reduce waste, consider using reusable containers or compostable wraps for storing your meals.
For a touch of convenience and variety, you might want to bring along a BLENDi portable blender. With models like the Lite, Pro+, and X, you can whip up fresh smoothies or shakes right on the trail. Simply blend ingredients like powdered greens, protein powders, or dried fruits for a quick, wholesome meal. It’s an easy way to stay energized while keeping your meals healthy and environmentally friendly.

Leave a comment
This site is protected by hCaptcha and the hCaptcha Privacy Policy and Terms of Service apply.